

Can You Change The Battery On A Galaxy S7
Introduction
Is your bombardment running out way too fast? Are y'all forced to recharge your S7 more than than in one case a day? This guide volition show you how to remove the tired one-time battery in your S7 and replace it with a new ane.
Note that the video guide recommends removing the SIM bill of fare. This is not necessary, but won't negatively affect repair if you do remove it.
Before disassembling your phone, discharge the bombardment below 25%. A charged lithium-ion battery can catch fire and/or explode if accidentally punctured.
If your bombardment is bloated, take appropriate precautions. Do not oestrus your phone. If needed, you lot can employ a dropper or syringe to inject isopropyl alcohol (90+%) around the edges of the back cover to weaken the adhesive. Swollen batteries can be very dangerous, so habiliment eye protection and exercise due circumspection, or take it to a professional if you're not sure how to proceed.
Video Overview
-
-
Apply a heated iOpener to a long edge of the phone for about ii minutes.
-
-
-
When the dorsum console is warm to the bear upon, use a suction loving cup as close to the heated border of the phone equally you can while avoiding the curved edge.
-
Lift on the suction cup and insert an opening option nether the rear glass.
-
-
-
Once you have the choice firmly inserted into the glass, reheat and reapply the iOpener to soften the adhesive.
-
-
-
Slide the opening pick down along the side of the phone, separating the agglutinative.
-
Go out the pick in place and grab a second choice as you go along to the next pace. Leaving the pick inserted can help prevent the glue you just separated from re-adhering.
-
-
-
Echo the previous heating and cutting procedure for the remaining iii sides of the phone.
-
Get out an opening pick in each edge of the phone equally you continue to the adjacent to prevent the adhesive from resealing.
-
-
-
Lift the glass and remove it from the telephone.
-
-
-
If y'all're cleaning the midframe surface with isopropyl alcohol, be careful not to get any alcohol on the wireless charging coil. The curlicue blanket will interruption downwards if it contacts alcohol.
-
-
-
Remove the twelve 3.5 mm Phillips screws.
-
-
-
Insert the tip of a spudger into the small notch on the left side of the antenna assembly, and pry the assembly up and out of the frame.
-
Remove the antenna associates.
-
-
-
Use the flat terminate of a spudger to lift the charging coil assembly out of the telephone.
-
-
-
Employ the flat end of a spudger to pry upward and remove the loudspeaker assembly.
-
-
-
Use the apartment end of a spudger to disconnect the bombardment connector.
-
-
-
Employ some loftier concentration (>90%) isopropyl alcohol under each corner of the bombardment and allow information technology to penetrate for several minutes to help weaken the adhesive.
-
Alternatively, prepare an iOpener and apply it directly to the battery.
-
Use the iOpener for at to the lowest degree a infinitesimal to soften the battery agglutinative.
-
-
-
Use an opening pick to pry upwards the battery from the bottom.
-
-
-
Slide an opening pick upwardly the side of the bombardment to break apart any remaining agglutinative.
-
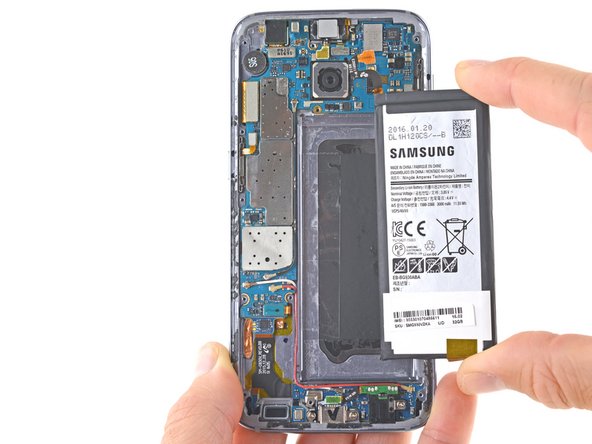
Lift the battery out of the case.
-


Embed this guide
Choose a size and copy the code below to embed this guide as a small-scale widget on your site / forum.
Preview
Source: https://www.ifixit.com/Guide/Samsung+Galaxy+S7+Battery+Replacement/90299
Posted by: woodsfambireett.blogspot.com
0 Response to "Can You Change The Battery On A Galaxy S7"
Post a Comment